Showing posts with label Food: Pachai-Milagai. Show all posts

Friday, February 5, 2021

Arachuvita Sambar - Madurai Style

Sambar was not the go to food when I grew up. Please don't judge me for that. I had too many other varieties to be spoilt with. And just the habit of seeing and eating Sambar in every restaurant, wedding, feast, family visits, house warming ceremonies, made it not too special until I moved to Germany after getting married.

Guess what....The first item that i ever cooked in Germany or I ever cooked for my husband is 'The Legendary Sambar'. It tasted heavenly. May be it was not the best of the sambar's I had been exposed to in Madurai. But a spicy and flavorful sambar with all veggies in that cold, grey new place just made it taste heavenly. That is when i started loving sambar. My sambar should always have at least 5 veggies, the flavor of all veggies should blend in with the dal and the consistency has to be rich.

Here is a wonderful version of Madurai Hotel Style Sambar which takes a little extra bit of grinding than the regular quick version. Once you try this style, I can guarantee you that you will make some extra time to get the oomph factor from grinding some special ingredients.


Ingredients:

For Sambar:

Toor Dal - 1/2 cup
Masoor Dal - 1/2 cup
Moon Dal - 1/2 cup
Onion - 1/2 
Tomato - 1/2
Drumstick - 5 pieces
Green capsicum - 1/2 cut into cubes
Carrots - 1 medium size
Brinjal - 1 small
Bottle Gourd - 4 cubes (ignore if you dont have this)
Raw mango - 2 small pieces (highly recommend, i always have frozen ones if not in season)
Tamarind - berry size (soaked in warm water)
Green chilly - 2 pieces
Salt (for taste)
Coriander leaves (for garnish)
Turmeric powder - 1/2 tsp
Cumin powder - 1 tsp
Coriander powder - 1/2 tbsp
Red Chilli powder - 2 tsp
Sambar powder - 2 tbsp

For Grinding:

Onion - 1/2 (cut into cubes)
Tomato - 1/2 (cut into cubes)
Grated coconut - 1 handful

For tempering:

Hing - a small bit (Sambar cannot be done without this small yet powerful ingredient ;))
Mustard seeds - 1 tsp
Cumin seeds - 1 tsp
Fenugreek seeds - 1/4 tsp
Urud Dal - 1 tsp
Curry leaves - 1 sprig

How to Make Base Dal:

  1. Cut all the veggies to cube sizes
  2. Add all 3 Dals from Ingredients with 1:2 ratio of water for each Dal in a pressure cooker (I have used three 1/2 cups of Dal. So i will use 3 cups of water and a 1/2 cup more for veggies).
  3. Add 1/2 cubed onions, 1/2 cubed tomatoes, all veggies except for carrot, capsicum and raw mango to the Dal
  4. Add turmeric powder and hing.
  5. Close the pressure cooker and cook the Dal with veggies for 3 whistles. Keep the cooker away from heat for it to cool down.

How to make the special paste:

  • In a kadai, add 1/2 of cubes onions and sauté.
  • Once translucent, add 1/2 tomato and sauté until tomato gets mushy.
  • To the above, add a handful of grated coconut. Give it a nice stir until coconut aroma comes out. 
  • Let the mixture cool and grind it with very little water into a thick paste.

How to make Sambar:

  1. In a kadai, add 1 tbsp refined oil or ghee
  2. once the oil heats up, add Capsicum and saute until half cooked
  3. Add cumin powder, coriander powder, red chilli powder and sambar powder
  4. Saute until the raw smell of powder goes away
  5. Add tamarind water and let it boil for 2 mins
  6. Add the Dal-Veggie mixture from the pressure cooker.
  7. Add a cup of water if the mixture is too thick
  8. Give it all a good mix
  9. Add raw mango pieces now
  10. Add the special ground paste to the above mix (Add more water if you think the consistency is too thick)
  11. Bring everything to a boil
  12. Check for salt, tang and spice level. Adjust if you need to.
  13. Finally garnish with Coriander leaves
  14. In a small pan, add oil and all ingredients under tempering. Once the mustard splutters and the urud dal turns to golden brown, add the tempering to Sambar

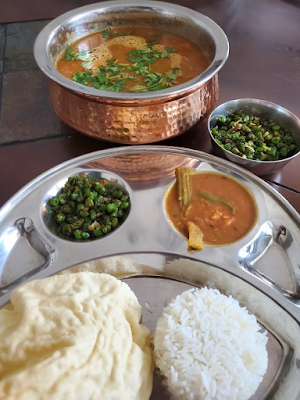
Aromatic, flavorful, nutritious, protein packed amazing Sambar is ready to be served with Idli, Dosai, White rice, Ven pongal, Vadai - anything that you please to have it with. I had them with plain white rice, a big generous amount of ghee to enhance the aromas, Beans Poriyal and Appalam,. Heavenly!!!

Guten Apetit! And wish you all a happy sambar day that fills your tummy and mind with joy. May you party with Sambar just like the many ingredients come together to party as Sambar :)


Monday, May 18, 2020

Buttermilk/ Chaas/ Neer Mor

Summer Vacation is something spent at grandmother or aunt's place. Every year we re-group as family during summer. The minute i think about Summer and Madurai, the first thing comes to my mind is Chithirai Thriuvizha - It lasts for one month of which the first 15 days mark the celebrations of the coronation of Goddess Meenakshi and the Marriage of Lord Sundareswara and Goddess Meenakshi, and the next 15 days mark the celebrations of the Journey of Lord Alagar from Kallazhagar temple in Alagar Koyil to Madurai.

When Alagar continues his journey through the streets of Madurai, he pit stops now and then at many mandapams to take rest (which also gave the priests travelling with him to rest, eat and freshen up while giving the devotees a good darshan of the god). Since throusands of people come to watch this from all around Madurai, having Mor(Buttermilk) Pandal was very common. These Pandals are buttermilk/water/panagam spots where anyone can go to grab a glass to quench the thirst. My most favorite drink is the Neer Mor which is called as Chaas in North. Yet another wonder food available on this day is Kovil Puliyodharai - so heavenly with the smell of edible camphor.


I don't have a curd culture at home due to the lockdown. If you have home made curd, i highly recommend you to use that. So i used the store bought Curd for preparing this drink that acts as the best coolant on a very hot day.


Hope you give a try to this very simple refreshing drink. It might sound too simple, but tastes amazing.


Ingredients: (Serves for 2)

Curd - 1 cup

Curry leaves - 4 leaves

Green chilli - 1 small

Ginger - 1 tsp thinly sliced

Coriander leaves - few chopped

Mint leaves - few chopped

Salt as needed

Raw Mango - few small pieces (if available)

Water - 2 cups


How to prepare:

1.Add curd to a narrow container with slight long neck.


2.Add water to the curd.


3.Using an egg/butter beater, beat the curd in water for 5 mins until you see froth appearing on top.


4.Add salt, Curry leaves, Green chilli, Ginger, Corinader leaves, Mint leaves to this mix.


5.I try to use the tea kadai kaarar technique where the tea vendor pours the tea from one glass to another with a long pour. Make sure you aim right at the cup and not anywhere else. If it is in cup is becomes Neer Mor otherwise it will be a more wasted Mor ;).


I love adding raw mango pieces to buttermilk. It gives the drink a nice sourness and aroma contrasting the spice from the ginger.


Buttermilk is a great combo while consuming any deep fried dish. I served it with Poori, Split Green Lentil Dhaba Style along with Cucumber-Carrot Salad.


Guten Apetit!

Cheers to Mor(e)!!!

How to make Poori / Puri / Puffed Indian Bread

It is a nice and pleasant weather here in Florida today. While watering the Jasmine and Mango plants, hoping someday i will have a backyard filled with Jasmine aroma, while relishing the mangoes from the tree, which is a far fetched dream at this point. But hope is what makes life interesting, don't you think. I took a beautiful shot of the Flame of the Forest blooming in May. It was so fiery while the lake was so calm and untouched. What a contrast!


I have to be honest with the readers when i talk about Pooris - a Deep Fried Puffed Indian Bread made of wheat flour. I'm not a big fan of pooris when i was a kid. I guess i don't like many deep fried items in general even as an adult, which is a blessing (because it is Healthier) and a curse (because i miss out to taste and appreciate a lot of deep fried Indian food or snacks).  I do rarely crave for poori and potato masala (south indian style) or poori and chole (north indian style).


The main reason i started making pooris and had to get a hang of how to make them is because of my kid. Whenever we go to my parents house, my mom will have her perfectly round pooris with Chicken Kuzhambu / Gravy ready for breakfast. That is the combo i grew up with. My son adores my mom's pooris and chicken. He will rate it the best in the world and mine goes to second in the line ;).

I know there are many tricks and tips to add in the dough like rava / sooji so that puffed up pooris will keep their shape without getting soggy and sad. But today I'm making it for lunch with just wheat flour on a Monday noon during Quarantine just see that big bright smile on my son's face and those sparkling eyes asking 'Mama, is it poori on a weekday?'. He couldn't believe his eyes...haha. It was worth the effort and time :).


Ingredients:
Wheat Flour - 2 cups
Water to knead
Salt as desired
Sunflower oil to drizzle

How to make the dough:
It took some trials to get a hang of kneading a roti dough versus kneading a poori dough. The poori dough needs to be stiff and tight. If you poke a finger in the dough, it should be like poking a clay. So use as little water as you go to knead the dough. 

1. Take the dry flour in a pan, add salt and drizzle i tsp of oil to it. Mix well to get rid of any crumble or lump.

2. Add very little water at a time and keep mixing it until the dough has just enough water to be kneaded to a tight ball. 

3.Be patient while kneading. If you spend a little more time than usual during this process, you will feel your heart puffing up with pride when you notice the pooris puffing up in oil :).

4. Keep the dough aside with a lid covered to make sure the dough doesn't get dry.


How to roll the dough for Pooris:
You can skip this step if you are using a Poori Presser like what my mom has. I dont have one where i live. So im going for the old school method of using Rolling pin.
While rolling the dough, add oil to a small pan to deep fry the pooris. Turn on the heat to more than medium so that oil gets heated.

1.Take a small size of dough, possibly shape of a table tennis ball. Roll them between your palm to get a smooth ball shape.

2. Dust it in dry flour. Press it on the kitchen counter top or rolling pan.

3. This step is as crucial as kneading the flour. Using a rolling pin, carefully smooth out the sides of the dough to make it to a flat round shape. Dont thin out the centre part too much otherwise there wont be enough dough left for the pooris to puff. The rolled out dough should be a little thicker than how we roll out for Phulkas.


4. Make a small batch so they can be fried one after another. Fry them immediately otherwise the dough can become dry.

How to fry the Pooris:
By now the oil should had heated up to fry the pooris.

1. Take a tiny bit of dough. Press is between your fingers and throw it in the hot oil. If it sizzles and floats on oil right away, the oil is hot enough for us to fry the pooris.

2. Take one poori a time,  slide them gently into the oil. Make sure you do this carefully as you don't want hot oil to splash.

3. Once the poori rises to the top of the oil, press it gently in with a laddle. This helps the pooris to puff. Cook for few seconds and Turn to the other side and let it fry for few seconds. You should see light golden glaze on top. Remove the poori and place it on a paper towel for the oil to be absorbed.


4. Repeat step 2 and 3 for the rest of the rolled out dough.

Please watch the video below on how to fry the pooris:


Eat the Suda-Suda (Super Hot) right away with Aloo/Potato Masala or Chole/Channa Masala or Chicken Kumzhambu/Gravy. Today we had it with Split Green Lentils Dhaba Style Gravy. I will try to post the recipes for the above list one at a time. I served the pooris and dal with some cucumber-carrot salad and some home made Spiced up Buttermilk/ Chaas.


Guten Apetit!
Happy Puffing!!! :)


Wednesday, May 13, 2020

DIM SIM in Clear Soup

Sitting through the quarantine days in 2020, the only change I like to bring in my everyday life to my family is venturing in different cuisines. My family has fervent travelers. We spend so much time planning to visit a new location to experience and explore new culture and meet people of the world. The planning gives us a sense of what to look forward to. 

Most important part of the travel is food that one gets to explore and experiment. I have been missing the hot, soft, flavorful dim sims for quite sometime now. Never had attempted to try them at home as i was so sure i was going to ruin my wonderful memories of eating those dim sims in Singapore. But are Dim sims same as Dumplings? It is a very strong topic to argue about. In a gist i concluded that Dim Sims and Dumplings can be cousins, from the locals of Singapore.

My good looking dashing Dim Sim

Now that I'm left with no choice but to drool over those photos of dim sims in chili oil taken a while back and the fact that i have a lot of time in hand, i finally took the challenge to recreate those dumplings at home. I did some research and i also have a video of how dim sims (with ground pork) were made in a small eatery while in Singapore. Funny, i had to pause and replay the video so many times to get the hang of it as the chef was making 10 dumplings in 10 secs, like it was his second nature. The secret to get a perfect looking dim sim is in the way the dough is rolled and folded. I was not even close to the quality you can see in the below photo. But hey I'm not a professional (yet). I will be there sometime in like 10 years may be! ;)

Photos clicked in a small eatery in Singapore


Ingredients:
=========

For Dough (to make 8 dim sims)
---------------------------------------
Maida / All purpose flour - 2 cups
Oil - 2 tsp
Salt as needed

For Dim sim filling
------------------------
Carrots diced - 1/2 cup
Cabbage shredded - 1 cup
Cauliflower shredded - 1/2 cup
Mushrooms diced - 1 cup (Replace Mushroom with ground chicken or pork if desired)
Spinach - 1/2 cup
Onions diced - 1/2 cup
Green chili / Jalapeno - few small bits
Ginger Garlic paste - 1 tsp
White sesame seeds - 1 1/2 tsp (optional)
Dark soy sauce - 1/2 tsp
Sriracha/Red chili sauce - 1/2 tsp

For Clear soup
-------------------
Vegetable/Chicken Broth - 3 cups
Frozen Green peas - 1/4 cup
 Frozen corn - 1/4 cup
Spinach - 1 cup
Mushrooms - 1/2 cup
Spring onions
Salt as needed
Black Pepper as needed

For Chili oil
----------------
Crushed dried red chili
Sesame oil (Highly recommended. If not available, substitute with sunflower oil)

How to make Dim Sim

1. Add the items under 'For Dough'. Mix it with hand to get rid of lumps. Add little water at a time to knead it to a firm dough. Once the dough is smooth and firm, set it aside for 30 mins with a lid covered to make sure the dough doesn't get dry.

2. Gather all the items listed under 'For Dim Sim filling'. Make sure to diced the veggies into tiny bits as shown below:


On a pan, add 1 tsp of sesame oil (or sunflower oil). Once the oil is hot, add chopped onions. saute until translucent. Add white sesame seeds to onions. Wait until the seeds pop. Add all other veggies that were cut. To this mixture, add soy sauce and sriracha sauce. Saute until the veggies are half cooked but still crunchy. Keep aside to let it cool.


3. Divide the dough to small balls. Roll them as thin as possible with a rolling pin. Use dry flour to dust on the dough if they are sticky. Make sure the ends are thin and the center a slightly thicker. To get a perfect round, i used a bowl with sharp edges to cut it out. Add a small spoon of filling to the rolled out dough. 

4. Now comes the tricky part and i was so involved in getting the fold right that i forgot to click a photo. Technically it is like folding any of our Indian paranthas with filling inside. Fold the sides like a zig zag pattern until the circumference is covered and twist the top to close the opening. Just make sure you dont add too much filling then it becomes difficult to seal the Dim Sim. 

5. Make a batch of Dim Sims and then add it to a steamer. I used an Idli pan for the purpose.Steam the Dim Sims for 7 mins. Take the steamer of the heat and let the dim sims sit int he steamer until they are ready to be served as a snack or to be added to a hot soup.

How to make Clear Soup
1. Pour Vegetable/ Chicken stock in a pan. Add Frozen peas, corn, spinach, mushrooms to the stock. Bring it to a rolling boil. Add salt and black pepper.


How to make Chili oil (in a hurry)
1. Add 1 tbsp of Sesame oil (or sunflower oil) to a small pan. Keep the pan in medium heat. Add crushed Red chilies (with seeds) and immediately add 2 tsp of red chili powder to give the smokey flavor.

Service Dim Sim and Soup in a bowl while they are hot. Sprinkle some spring onions on the soup. If you wish to have the Dim Sim as such, eat it as a snack with some hot green tea on the side.


I also made a side serving of Vegetable-Egg Fried Rice on the side for the hungry bellies at home :).


Don't forget to add a dash of chili oil to the hot soup with dim sim. They just taste so heavenly, flavorful and amazing on a rainy day. My boys had a sumptuous lunch on a weekday! 


Guten Appetit!
Happy Slurping!


Thursday, June 27, 2013

ஆமை வடை / Masal Vadai / Paruppu Vadai / Lentil Fritters


My family's all time favourite snack.Born in Madurai i never ever assumed anybody would even cook vadai at home.Because we get different varities of vadai from so many டீ கடைs (tea shop) all around round the clock....and who would care to put in all the efforts to make one variety of vadai at home ;-),luxury i know!But never realised till i got to live in Bonn , Germany after i got married.

Two dishes i learnt(dint cook but only took notes:)) before i flew to Germany from one of my good friends Vinodh,who is a better cook than i am was Dal and Masal Vadai.Dal being A's favourite and vadai being mine.....made sense to atleast have two recipes handy ;-)!

You should be wondering why this name to Masal Vadai.I assume Aamai vadai was named after the fact that the vadai itself looks like an "Aamai" (translated to 'Tortoise' in English) with hard shells around soft insides.

Whenever i make this vadai,one person i never forget to think of is my dad-in-law.I should say he is an ardent fan of this Vadai,especially when I make it.We interact more like friends than in laws.It is a pleasure to make him this vadai whenever he visits us.
Any usual recipe will use channa dal in a larger proportion.Here i add toor dal more for a healthier version.


Ingredients:

Toor dal / துவரம் பருப்பு  - 1 cup
Channa dal /கடலை பருப்பு  - 1/2 cup
Onion - 1 medium
Green chillies - 3
Curry leaves - 1 sprig
Coriander leaves - few chopped
Pudina leaves - one or two chopped
Raw rice - 1 tbsp
Cumin seeds - 1 tsp
Fennel seeds - 2 tsps
Salt as required
Oil to fry


Preparation:

1.Soak Toor dal,Channa dal and Raw rice in ample amount of water for atleast 3 hours.
2.After 3 hours,grind the dal mixture coarsely without any water.(save a small handful of dal before grinding....gives a crunchiness to the vadai when fried).If you think you should add water depending on the mixer you are using...add very little water.
3.Once done,add chopped onions and the rest of the ingredients along with salt and mix well using your hand.


4.Add oil in a kadai while you mix the above.
5.As soon as the oil is hot enough,make small balls of the mixture and pat them little(i like my vadai small)
6.Drop them in oil one by one.You can fry 6-7 vadais in a batch depending on the size of the vadai and the kadai.


7.Turn the vadai around after like 2 minutes.Once the sizzling stops you know your vadai is done.Just see to it the colour of the vadai is brown like in the picture.


Notes:
1.If you are running out of time and dont have 3 hours to soak the dal,add hot water to the dal for an hour and you will get your job done(works most of the times for a lazy-cozy like me:))
2.Add salt to the ground dal just before you intend to fry.Because adding salt and leaving the mixture out for a long time makes the mixture watery.
3.Raw rice is added to make the vadai crispier.Instead my mother adds Split peas / பட்டாணி பருப்பு .This gives a different flavor all together.I would hghly recommend you to try this if you get the split peas at your place.
4.If you think you can handle the after effects of the snacks...go ahead and reverse the ratio of the dals ;-)


Nothing can compare to the taste of crispness of the vadai ,smell of fried dal and the hottness of green chillies now and then in the mouth  along with a sip of hot coffee on a rainy day:-)


Guten Appetit!
Happy Snack-ing!!!


Monday, June 3, 2013

Poondu Milagu Kuzhambu / பூண்டு மிளகு குழம்பு / Garlic in Pepper Gravy

Poondu Milagu Kuzhambu is one dish i wish to have right after a week of heavy meal because of its medicinal values.


Benefits of Garlic:
- help reduce heart disease
- lower blood pressure by dilating or expanding blood vessels
- helps prevent blood clots 
- reduce pain and other symptoms in people with rheumatoid arthritis
- an antibiotic killing a range of microbes, including viruses, bacteria, fungi, and parasites
Benefits of Pepper:
- treats constipation, diarrhea, earache, heart disease, hernia, indigestion, insect bites, insomnia, joint pain, lung disease, sunburn and toothaches. 

Garlic and pepper together simmered in tamarind has been found to 
- aid digestion 
- cleanse digestive system
- relieve abdominal bloating, nausea, vomiting, anemia 
- they also help lactating mothers in the production of breast milk.


As kids,I and my elder brother had most similar tastes when it comes to food or may be it was like i got inspired to try by looking at him relishing his food;-).Either ways thanks to him for making this wonder kuzhambu a part of my food palette:-).


Ingredients:

Garlic pods - 10
Curry leaves - 7
Tamarind - lemon sized
Jaggery - a pinch
Turmeric powder - 1/4 tsp
Fenugreek powder - 1/4 tsp
Gingely oil / Nallennai - 3 tbsp
Salt - as required

To grind into a fine paste:

Garlic pods - 3
Channa dal - 2 tbsp
Urud dal - 2 tbsp
Peppercorns - 2 1/2 tbsp
Coriander seeds - 2 tbsp
Curry leaves - 1 sprig
Whole dried red chilly - 2
Raw rice - 1 tsp


Preparation:

1.Pour 1 tbsp oil in a kadai and roast the items below 'to grind' one after another for 2 minutes.


2.Grind the above mix with little water and make it into a fine paste.

3.Soak tamarind in hot water and keep the pulp aside.Let the pulp be thick as it reduces the time while thickening the gravy.

4.In the same kadai,pour 1 tbsp oil and add fenugreek powder.Make sure you don't burn them as it will give a bitter taste to the gravy.

5.Then add curry leaves followed by garlic pods.Let it fry for a minute till the garlic pods turns light golden brown.

6.Add the thick tamarind pulp and turmeric powder.Mix well till the raw smell of tamarind goes off.


7.Now mix in the ground paste.


Here, i like adding freshly coarsely ground pepper,may be 1 tsp,to give the freshness of the pepper to the gravy.


8.Add required salt and let the gravy thicken.


9.Finally add jaggery to counter the hot n sour taste.


9.When you see oil appear on the gravy your kuzhambu is ready to be served.


As this gravy is prepared as pathiya saapaadu(Non fatty diet food to cleanse the digestive organs), i dont prepare any side dishes.Just a microwaved appalam will do best!:)
You can store this gravy in the refrigerator.Stays good up till a week's time.


Healthy Lunching!!! :-)